
Kevin Barrett
MobiLurver
- Real Name
- Kevin Barrett
- Onsite
- Project Page
Watch the video and learn the answer... Oh, you already know the answer! Just watch it anyway!!
")
I thought you meant printing straight from the iPhone! However, great video. And thanks for the contact. Have subscribed to his videos. Some interesting ones to watch.
Watch the video and learn the answer... Oh, you already know the answer! Just watch it anyway!!
I've searched, too. Except for a few useful tutorials on specific apps, all the mobile videos seemed to be "Shoot like a PRO with these 11Anyone know any YouTube channels dedicated to mobile photography? Not just iPhone but general.
What a great video. So informative. Thank you Kevin.
Watch the video and learn the answer... Oh, you already know the answer! Just watch it anyway!!
Yes you're absolutely right. Plenty of app specific stuff and the usual tips and tricks but nothing of note. I think the problem is mobile photography is still not taken very seriously, it's a bit of a joke, pull a face and put a funny filter on, leave 'real' photography for the grownups.I've searched, too. Except for a few useful tutorials on specific apps, all the mobile videos seemed to be "Shoot like a PRO with these 11hackneyedawesome tips" sort of thing. I'd love to hear about it if you find anything.
Just found a link to this in my emails... maybe something you are looking for there? B&H Photo Email LinkAnyone know any YouTube channels dedicated to mobile photography? Not just iPhone but general.
Thanks Dee, still not Mobile specific though.Just found a link to this in my emails... maybe something you are looking for there? B&H Photo Email Link
Good video, but IMO he was too flip in promoting the computational photography advantages over the pronounced benefits of raw capture, particularly when the entire raw-accessible dynamic range of the individual camera’s sensor is utilized. Failure to use even a single extra stop of DR forfeits 50% of the potential tonal spectrum provided by the 12bit-depth raw image file. Unfortunately, most who shoot raw with a smartphone settle for exposure dictated by the Jpeg highlight clipping warning, thus forfeiting much raw-accessible dynamic range - and attendant image data quality- to be accessed beyond the right end of the Jpeg histogram frame!
Watch the video and learn the answer... Oh, you already know the answer! Just watch it anyway!!
I feel a bit foolish for saying this, but I don’t understand what you mean.Good video, but IMO he was too flip in promoting the computational photography advantages over the pronounced benefits of raw capture, particularly when the entire raw-accessible dynamic range of the individual camera’s sensor is utilized. Failure to use even a single extra stop of DR forfeits 50% of the potential tonal spectrum provided by the 12bit-depth raw image file. Unfortunately, most who shoot raw with a smartphone settle for exposure dictated by the Jpeg highlight clipping warning, thus forfeiting much raw-accessible dynamic range - and attendant image data quality- to be accessed beyond the right end of the Jpeg histogram frame!
The improved image quality to be gained by use of the entire accessible DR is remarkable - as is the quality of the resultant large prints!
Dave
 I’d love to make higher quality images - how can I do that? Shoot in RAW and ...
I feel a bit foolish for saying this, but I don’t understand what you mean.
You are standing on the edge of a rabbit hole. You look down and see a maze of twisty little passages, all alike. Run away Y/N?I feel a bit foolish for saying this, but I don’t understand what you mean.
But that’s not the end of the story:
Remember: all I'm offering is the truth. Nothing more.Continue down rabbit hole Y/N?
Maybe we should have a step by step teach in on RAW on Mobitog. i.e we all take a photo and then go through each step, just an idea right?You are standing on the edge of a rabbit hole. You look down and see a maze of twisty little passages, all alike. Run away Y/N?
Some additions to what Uuglypher has said:
When you open a raw file in your chosen editor, it will look rather flat compared to a straight-out-of-camera JPEG. It'll take a little practice to learn to tune the raw file to produce something that looks as good as the standard JPEG. And then it will take a little more practice to learn to take advantage of the extra range the raw file can give you and potentially produce something better than the standard JPEG.
And along with the greater color depth and dynamic range that Uuglypher mentioned, a raw file leaves it up to you to decide how much sharpening and noise reduction to apply to the file. Some people feel that out-of-camera JPEGs are oversharpened (giving a crunchy look and sometimes showing artifacts). And some feel that the camera processing is too heavy-handed in applying noise reduction, causing the image to lose detail. In "developing" a raw image, you make those decisions about sharpening and noise reduction yourself, so you can suit them to the individual image and to your intent.
You also need to alter your exposure technique to get the most out of raw captures. As Uuglypher said, the preview on the screen that most (or maybe all) camera apps show you as you frame up your shot is based on a JPEG rendering. But the raw file has greater range on the highlight end than the JPEG rendering does, so if you adjust your exposure to avoid highlight clipping based on what you see on the screen, you're not taking advantage of that extra range. (And if you do adjust your exposure for the raw file's extra range, then the JPEG that gets saved along with the raw will be overexposed.)
There's a $15 ebook titled Ultimate iPhone DNG that goes into much more detail about how to get the most out of raw shooting on an iPhone. It's three years old now, but I think everything still applies. (If you do a search in MT on the title, you'll find some comments from FundyBrian on it.)
Continue down rabbit hole Y/N?
Hi, Jilly,
Absolutely no need to feel foolish! I must apologize for not having been more clear and detailed in my statement.
The recommended video was excellent. My only criticism was that the presenter excessively emphasized the benefits of “computational photography” with 8bit-depth JPEG captures, but failed to emphasize the considerable benefits that accrue from the various ways to employ 12 bit-depth raw capture.
Yes; there are different ways to capture raw image files with our smartphones. Most smartphones do not offer raw capture as a default option. There are, however, a variety of third party apps that provide the opportunity to accomplish 12 bit-depth raw image data captures. I have tried six or seven of them and happen to settle on use the “Lightroom Mobile” app that permits either an “auto” mode of raw capture or a more technically refined “Pro” mode of raw capture, as well as providing the opportunity to proces your raw image file in the Lightroom processing app. The different apps present different UIs (user interfaces) and choosing the one that one feels to be “most intuitive” is a highly personal decision.
First; why consider raw capture?
The routinely used 8 bit-depth Jpeg file is characterized by a tonal spectrum of 256 distinct, discernible tones within the dynamic range from black to white.
The 12 bit-depth raw image data file - if captured with benefit of the camera’s entire raw-accessible dynamic range - is characterized by a tonal spectrum of 4096 distinct discernible tones within that same dynamic range from black to white.
The vast increase in tonal spectrum i in a 12 bit-depth raw file means that there is a far greater number of potential “cusps of detail” - potential edges between adjacent tones at which detail edges can be discerned/perceived and accentuated by sharpening.
Beyond having captured markedly improved image data quality you will have an image file permitting a far greater range of creative/ artistic interpretation than is ever possible with an 8 bit-depth Jpeg image file,
The simplest means of capturing a raw file is to choose the “raw” (DNG) option in the “Auto” mode and make the exposure.
This process basically exposes a raw capture the same as it would expose a Jpeg capture. The resulting raw image file will, indeed, benefit to some degree from an increased tonal spectrum and will, thereby, benefit from more discernible detail and will withstand greater enlargement that would an 8 bit-depth Jpeg file of the same scene.
That’s the quickest, simplest way to “shoot raw” and get an image file benefiting visibly from being a “raw capture”.
But that’s not the end of the story:
The phenomenon of “Extra Raw-accessible Dynamic Range” (ERADR) must be considered.
Every digital camera capable or rendering a raw capture (including many smartphone cameras) contains a sensor that delivers not only the “advertised Dynamic Range” (represented by the space enclosed by the in-camera Jpeg histogram frame) but also - likely the result of “glitches” in the hundreds of steps in its manufacture (“process variances”)- is capable of delivering a small amount to a larger amount of ERADR above and beyond the officially stated dynamic range for that camera model. Among different cameras of the same brand and model the amount of ERADR may vary from 1/3 stop to ss much as two and 2/3 stops or more! Each camera owner, if wishing to capture the highest possible quality image data must test the new camera to determine how much DR exists beyond the right of the Jpeg highlight clipping warning.
Capture of the maximum quality of image data is assured only if the entire extra raw-accessible DR is used.
This has covered a lot of ground.
The “rest of the story” detailing quantitating your camera’s ERADR and using it to assure maximal image data quality I will reserve for a future post.
Dave
Wow, thank you both. Beautifully explained.You are standing on the edge of a rabbit hole. You look down and see a maze of twisty little passages, all alike. Run away Y/N?
Some additions to what Uuglypher has said:
When you open a raw file in your chosen editor, it will look rather flat compared to a straight-out-of-camera JPEG. It'll take a little practice to learn to tune the raw file to produce something that looks as good as the standard JPEG. And then it will take a little more practice to learn to take advantage of the extra range the raw file can give you and potentially produce something better than the standard JPEG.
And along with the greater color depth and dynamic range that Uuglypher mentioned, a raw file leaves it up to you to decide how much sharpening and noise reduction to apply to the file. Some people feel that out-of-camera JPEGs are oversharpened (giving a crunchy look and sometimes showing artifacts). And some feel that the camera processing is too heavy-handed in applying noise reduction, causing the image to lose detail. In "developing" a raw image, you make those decisions about sharpening and noise reduction yourself, so you can suit them to the individual image and to your intent.
You also need to alter your exposure technique to get the most out of raw captures. As Uuglypher said, the preview on the screen that most (or maybe all) camera apps show you as you frame up your shot is based on a JPEG rendering. But the raw file has greater range on the highlight end than the JPEG rendering does, so if you adjust your exposure to avoid highlight clipping based on what you see on the screen, you're not taking advantage of that extra range. (And if you do adjust your exposure for the raw file's extra range, then the JPEG that gets saved along with the raw will be overexposed.)
There's a $15 ebook titled Ultimate iPhone DNG that goes into much more detail about how to get the most out of raw shooting on an iPhone. It's three years old now, but I think everything still applies. (If you do a search in MT on the title, you'll find some comments from FundyBrian on it.)
Continue down rabbit hole Y/N?
 I’ve always wanted to see what goes on down a rabbit hole.
Yes, that’s a good idea. Trouble is I’m not sure about importing the photos into Mobitog - I think the sight reduces the image size as it comes it, which might (or might not) affect things.Maybe we should have a step by step teach in on RAW on Mobitog. i.e we all take a photo and then go through each step, just an idea right?

Well I didn't quite mean it like that, you couldn't upload a RAW file here anyway. I'm still confused about RAW, it seems for everyday shots, then jpg files are fine. To upload onto the internet files have to be converted anyway.Yes, that’s a good idea. Trouble is I’m not sure about importing the photos into Mobitog - I think the sight reduces the image size as it comes it, which might (or might not) affect things.
Here's an analogy that might help.but otherwise it seems a bit pointless. Please someone tell me I'm wrong?
Hmmm ok. So will a photo of the cat taken in RAW and then converted to JPEG (JPG what's the difference?) look better than a photo taken in JPEG?Here's an analogy that might help.
Here's some statistic graphs, all show the same information, doesn't really matter what of.
View attachment 160929
The top graph is over 3 weeks. The bottom graph is over 2 months. If you take the last 3 weeks of the two month graph and expand it to the same scale as the top 3 week graph we have two graphs that display the same data very differently.
In this analogy, the top graph represents RAW output. You have more detail and can see clear patterns.
The second graph represents JPEG. It's the same information but there is less detail to see in it because JPEG has to compress, average out and interpolate.
These graphs show an obvious difference that you can spot a mile away but in practice, as mentioned above, to the eye there may be little difference to see between RAW and JPEG initially. But as the information is still there weather you can see it or not in RAW , you can use processing to bring that detail out so it can be seen. Can't do that with JPEG and if you try you can end up with it looking, as terse said, crunchy with artifacts (which I'm particularly and cheerfully at fault for doing I think).
I googled it for you so you don't have to.Hmmm ok. So will a photo of the cat taken in RAW and then converted to JPEG (JPG what's the difference?) look better than a photo taken in JPEG?
I personally don't think you'll see much difference, that slight amount of detail won't be obvious.
There are several of these types easy enough to find, I've pulled this out at random. In terms of detail, check out the blown out whites in the JPEG compared to the RAW. Now process both and you won't get any of that blown out white back in the JPEG but much nicer detailing in RAW.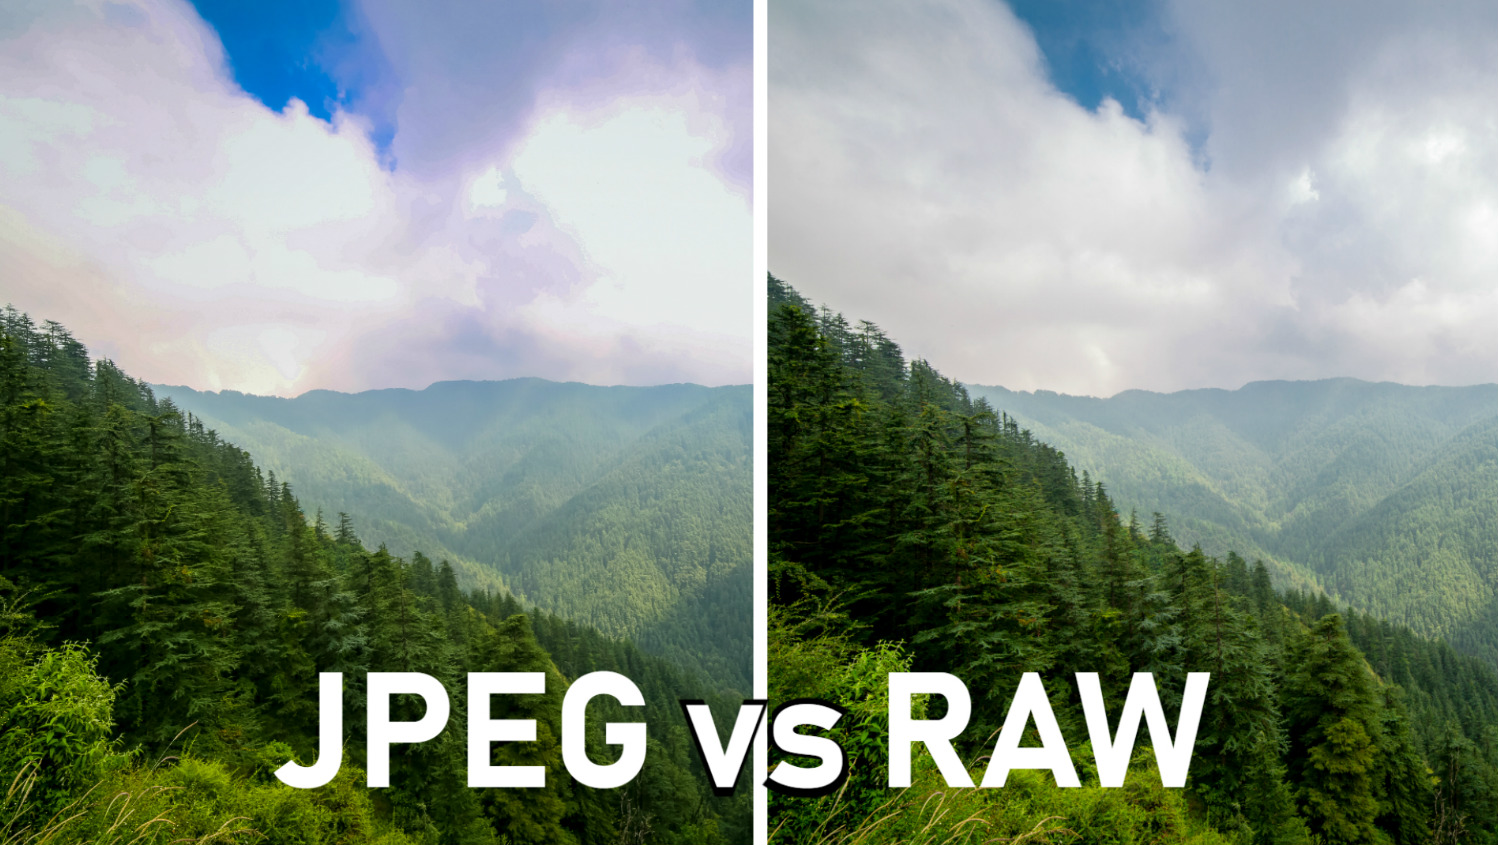
So if we go back to my original comments I said the only time I could see the point of using RAW would be landscape. Lo and behold your example is landscape. Which is why I said it wouldn't make much difference in a cat photoI googled it for you so you don't have to.
I know which I'd prefer.
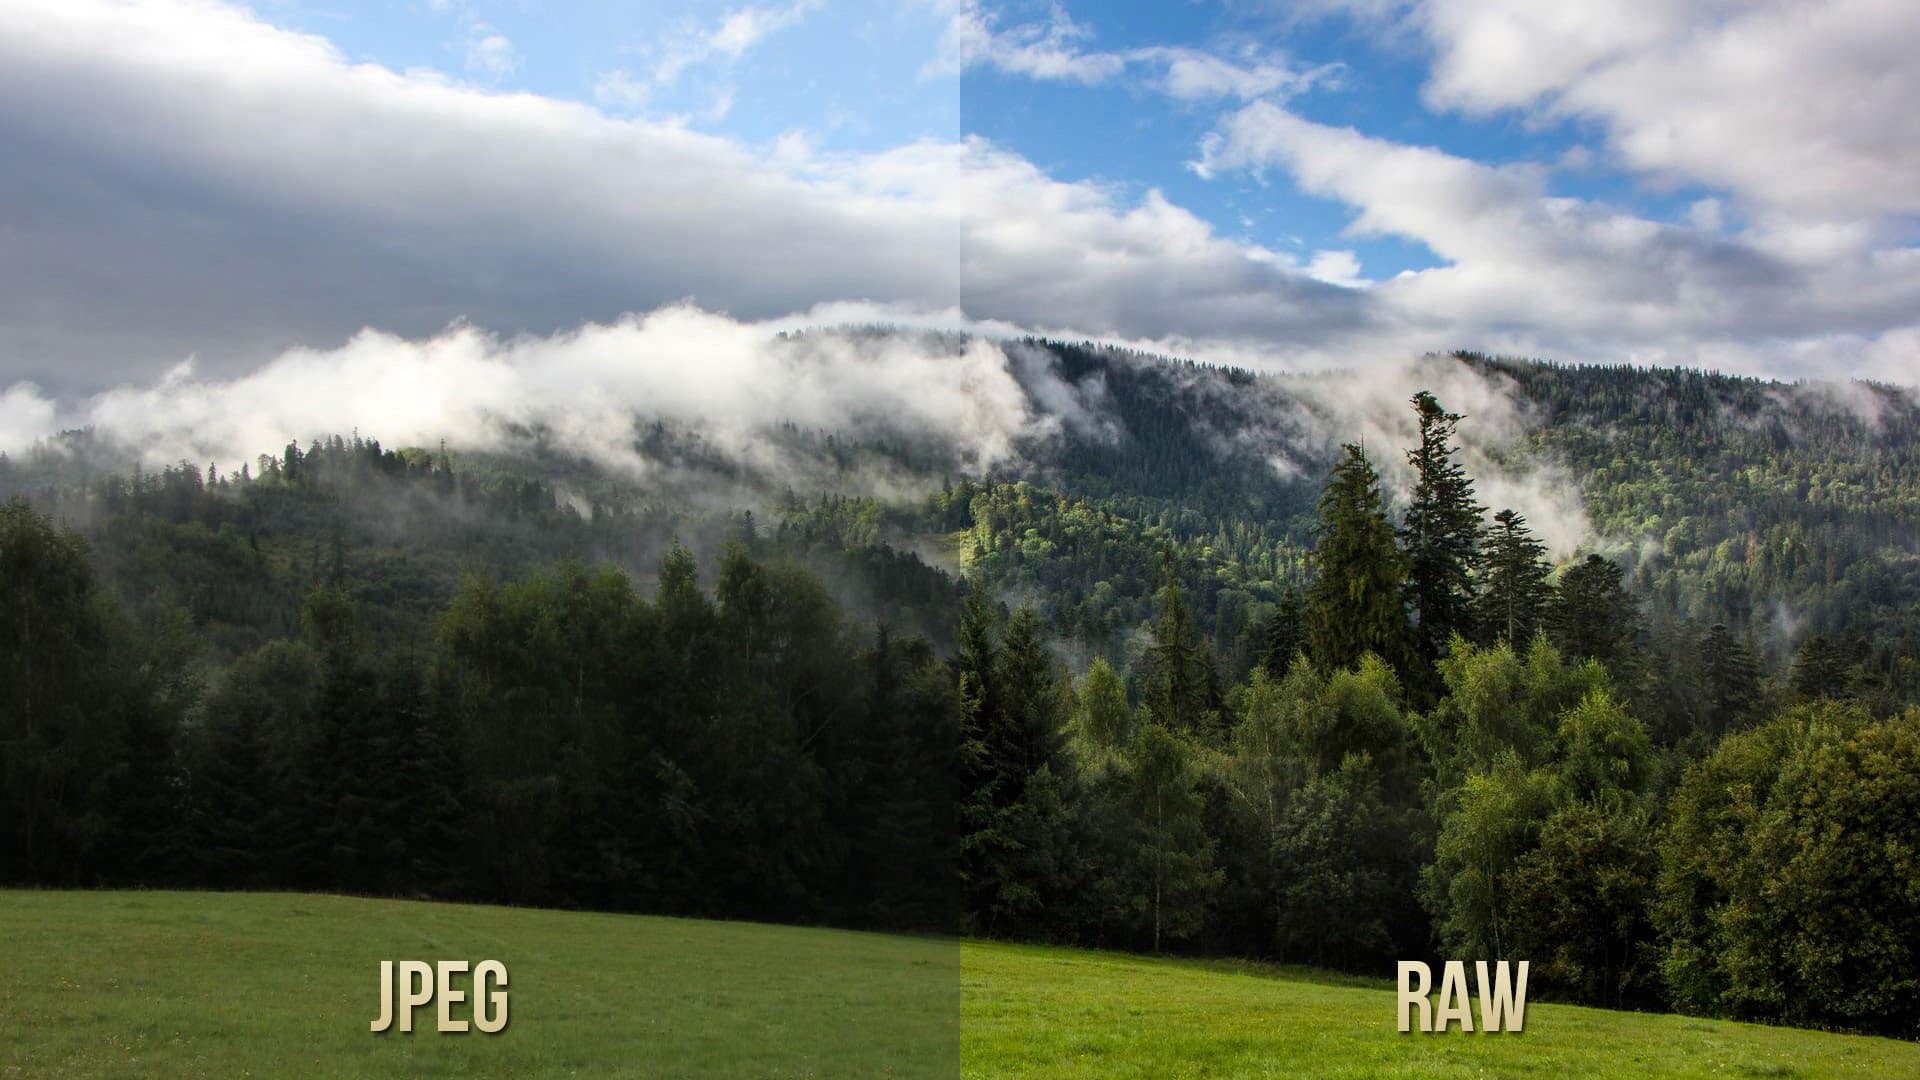
The one that really brought it home to me was this:
I included iPhone in my search terms but didn't check these two pics were taken by an iPhone. Not sure it matters, the difference looks big enough for me to stand up and notice.

Here, let me google that for you!So if we go back to my original comments I said the only time I could see the point of using RAW would be landscape. Lo and behold your example is landscape. Which is why I said it wouldn't make much difference in a cat photo
Not necessarily mobile photos then? The difference would be more noticeable on a DSLR I assume.

 googlethatforyou.com
No difference. JPEG is the official name and stands for Joint Photographic Experts Group (who codified the format). JPG is the file extension most commonly used because three letters were all that were allowed by file systems when the format was first used. JPEG and JPG get used interchangeably now.JPEG (JPG what's the difference?)
It does depend on the intended use, in many cases. So if I'm thinking of printing a particular image on an A3 sheet that I want to hang on my wall or enter in the county fair competition, I'll start with a raw capture. If I'm snapping a photo of the latest jigsaw puzzle we finished to email to my sister, I'll just shoot a JPG with the native cam.I'm still confused about RAW, it seems for everyday shots, then jpg files are fine. To upload onto the internet files have to be converted anyway.
I can maybe see the logic of using RAW for landscape, but otherwise it seems a bit pointless. Please someone tell me I'm wrong?