Oscar
MobiStarter
- Real Name
- R.V.
Here is a quick HDR Art tutorial how to do Day to Night images from practically any preset and a good image. HDR Art is a new iPhone app from Mediachance and can be d/l here: https://itunes.apple.com/us/app/hdr-art/id606109531?ls=1&mt=8
We already have couple of presets in HDR Art that do this effect in few variations but the purpose of this very quick tutorial is to show you how it is done and help you to discover the inner workings of the app.
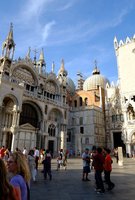
So let's start, what is a good image for this effect? The image must have well exposed sky and a lot of it - not just white, it is better to be dark than overexposed. This is essential for this effect.
Here is the input image, note the well exposed sky - this is essential for the effect we are trying to achieve.
I will load it in HDR Art and choose some clean preset like this Velvet Photo , which is a simulation of Velvia film stock from Fuji. Nice crispy colors. It is already pretty intense.
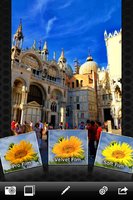
Now let's edit the values. Press the pencil icon.
The parameters are in an infinite loop and you simply scroll to the parameter, then change the value of it with slider. First step we want to put Exposure all way down. It is 5th parameter after initial Strength., bring it down.
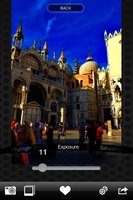
That clearly makes it dark ....
The Day to Night effect is based on an artificial Polarizer filter that can be run into pretty extreme settings if we have enough blue sky. Few more turns and we get to the Polarizer setting.
Here it is bumped up.
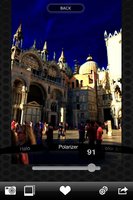
The sky is now dark but the image still looks like a daytime due to the natural lighting . We will change that.
The heart of the HDR Art is the tone-mapping and the heart of tonemapping operator is the Strength. So now scroll back until you get to the Strength. Turn it to add some "light" to the scene.
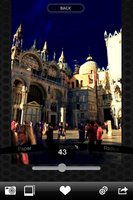
Another essential parameter of tonemapping operator is the Highlight and Shadow Recovery. Shadow recovery will add light to the shadows which will "un-naturalize" the light. Don't go overboard a little is enough.
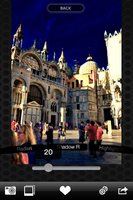
Here we are, we created a night-time feel from a normal daytime photo. You can now load other photos and see how they change. On some images this will look ok, on others not so and may require touch up. Remember, the more saturated the sky is at the beginning the better will this work.
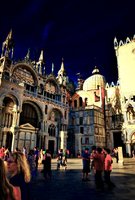
Add some funk.
Turn the edit dials to the Image Tint slider and just randomly move it from zero. It will add different color tint to the image - there is lot of it there.
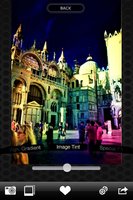
That's it. This is just a small part of what HDR Art can do.
If you want to save the preset to user setting (there is only one user space for now), press the heart button but there is already preset like this, so you don't have to - just tap the top of the screen to go back to the presets.
Hope you found this useful.
We already have couple of presets in HDR Art that do this effect in few variations but the purpose of this very quick tutorial is to show you how it is done and help you to discover the inner workings of the app.
So let's start, what is a good image for this effect? The image must have well exposed sky and a lot of it - not just white, it is better to be dark than overexposed. This is essential for this effect.
Here is the input image, note the well exposed sky - this is essential for the effect we are trying to achieve.

I will load it in HDR Art and choose some clean preset like this Velvet Photo , which is a simulation of Velvia film stock from Fuji. Nice crispy colors. It is already pretty intense.

Now let's edit the values. Press the pencil icon.
The parameters are in an infinite loop and you simply scroll to the parameter, then change the value of it with slider. First step we want to put Exposure all way down. It is 5th parameter after initial Strength., bring it down.

That clearly makes it dark ....
The Day to Night effect is based on an artificial Polarizer filter that can be run into pretty extreme settings if we have enough blue sky. Few more turns and we get to the Polarizer setting.
Here it is bumped up.

The sky is now dark but the image still looks like a daytime due to the natural lighting . We will change that.
The heart of the HDR Art is the tone-mapping and the heart of tonemapping operator is the Strength. So now scroll back until you get to the Strength. Turn it to add some "light" to the scene.

Another essential parameter of tonemapping operator is the Highlight and Shadow Recovery. Shadow recovery will add light to the shadows which will "un-naturalize" the light. Don't go overboard a little is enough.

Here we are, we created a night-time feel from a normal daytime photo. You can now load other photos and see how they change. On some images this will look ok, on others not so and may require touch up. Remember, the more saturated the sky is at the beginning the better will this work.

Add some funk.
Turn the edit dials to the Image Tint slider and just randomly move it from zero. It will add different color tint to the image - there is lot of it there.

That's it. This is just a small part of what HDR Art can do.
If you want to save the preset to user setting (there is only one user space for now), press the heart button but there is already preset like this, so you don't have to - just tap the top of the screen to go back to the presets.
Hope you found this useful.

