
Veevs
MobiLurver
Part 1 - transferring via wi-fi between iPhone and iPad

Make sure both your devices are connected to the wi-fi
Open up Photo Transfer App on both devices

For this tutorial I will receive send 3 images from my iPhone to my iPad.
On my iPad I click Receive and then click the 3rd box - Another iPhone or iPad

On my iPhone I click Send and then click on 3rd box - Another iPhone or iPad

Then click on Select Photos & Videos. Navigate to your photos and select the ones you want to send. For this example I just clicked on 3 but if you have a big chunk you can click on Select All. Please note you can only send a maximum of 100 at a time.

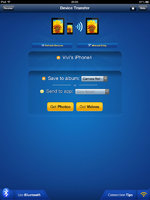
On the iPad click on Get Photos

This process is the same for transferring between iPad and iPhone and vice versa. When receiving files you can choose to save to your Camera Roll or to a Folder which you can create there and then. Next tutorial I will show you how to transfer from iPhone/iPad to PC and back (sorry dont have a MAC), and also Bluetooth.
Sent from my iPad using MobiTog
Make sure both your devices are connected to the wi-fi
Open up Photo Transfer App on both devices
For this tutorial I will receive send 3 images from my iPhone to my iPad.
On my iPad I click Receive and then click the 3rd box - Another iPhone or iPad
On my iPhone I click Send and then click on 3rd box - Another iPhone or iPad
Then click on Select Photos & Videos. Navigate to your photos and select the ones you want to send. For this example I just clicked on 3 but if you have a big chunk you can click on Select All. Please note you can only send a maximum of 100 at a time.
On the iPad click on Get Photos
This process is the same for transferring between iPad and iPhone and vice versa. When receiving files you can choose to save to your Camera Roll or to a Folder which you can create there and then. Next tutorial I will show you how to transfer from iPhone/iPad to PC and back (sorry dont have a MAC), and also Bluetooth.
Sent from my iPad using MobiTog

")

